There is a new Release Candidate (RC) version of PhoenixMiner 5.5c available that brings some new features, improvements and fixes over the things introduced already in the last beta version PhoenixMiner 5.5b. Do note that if using the miner on AMD GPUs, although it comes with support for the latest AMD Windows driver 21.1.1 it is still not recommended to use them as there seem to still be some stability issues. If you already are using the previous 5.5b beta version you might want to give this new release candidate a go, otherwise you might want to stick with the previous stable 5.4c release for a bit more.
PhoenixMiner 5.5c RC Full Changelog:
- Added support for the latest AMD Windows driver 21.1.1 (still, we don’t recommend using the 21.1.1 driver yet – we had some instability issues with it even when just idling on the desktop!)
- Added new -mcdag parameter to reset the memory overclock on Nvidia cards during DAG generation. This may allow you to set higher memory overclock on your Nvidia cards without risking corrupt DAG buffer, which can lead to excessive number of incorrect shares. Use -mcdag 1 (by default the value is 0, which means turned off) to use this new feature.
- – Under Linux -mcdag 1 will execute a shell script named daggen.sh (if present in the current directory) for each Nvidia GPU, passing the GPU index as the first argument, and PCIE bus ID as second argument. The miner will then wait for about 7 seconds before starting DAG generation to allow the script enough time to reset the memory overclock.
- – The -tt parameter is now strictly for controlling the fan behavior. E.g. -tt 60 sets auto-fan speed with target temperature 60C; -tt -70 sets fixed fan speed 70%; and -tt 0 turns off the fan control. All these can be specified per GPU.
- – There is a new -hwm parameter that allows controlling the frequency of the hardware monitoring, which was also done by -tt in the previous versions of PhoenixMiner
- – Other small improvements and fixes
Instruction manual
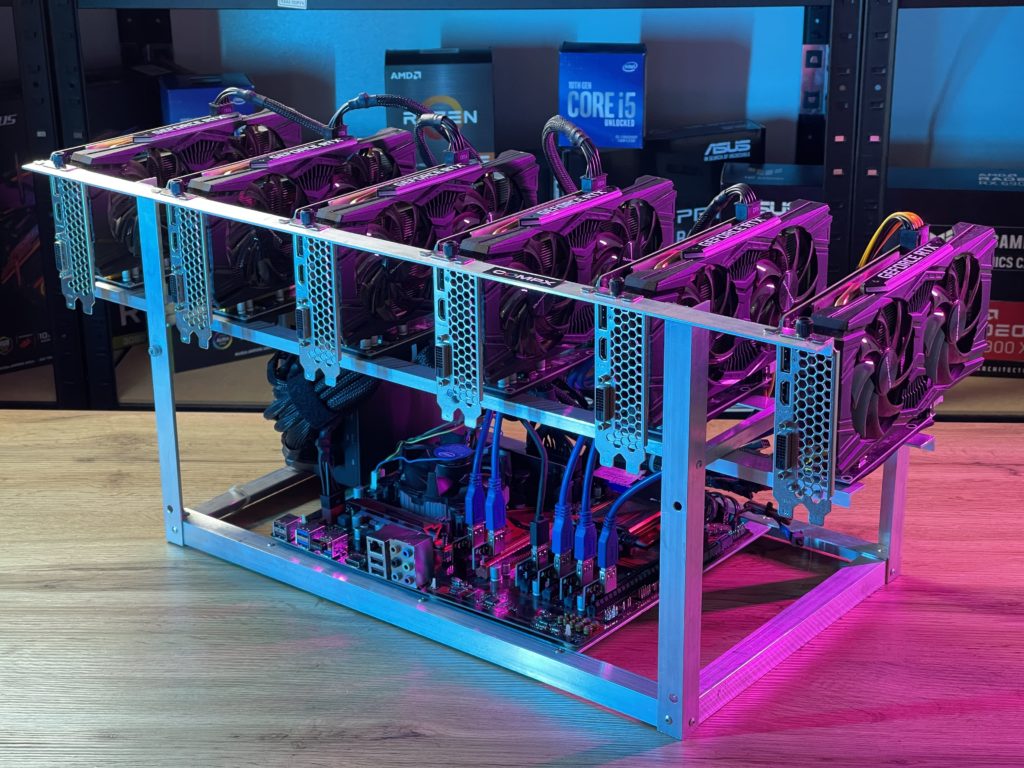
- Step 1. Install GPUs and configure your computer.
- Step 2 – Download the latest version of PhoenixMiner
- Step 3 – Get an Ethereum wallet (Mist or MyEtherWallet)
- Step 4 – Join the mining pool.
- Step 5 – Start mining!
Setting up a batch file for Ethereum
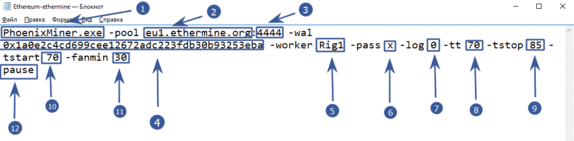
- PhoenixMiner.exe – this key indicates which program will be launched. We leave it as it is
- -pool eu1.ethermine.org – pool server. Change to another pool or leave ethermine
:4444pool port. It is indicated after the colon- -wal is the address of your digital wallet
- -worker Rig1 is the name of your farm worker. Used for the convenience of tracking statistics on the pool. You can specify any
- -pass x – password on the pool. Almost never used on pools. X value means no password
- -log 0 – is responsible for keeping the miner’s event log. 0 – means not to keep the log. If you set -log 1 , then the log will be kept without showing debug messages on the screen, if -log 2 – write the log and display debug messages on the screen
- -tt 70 – setting the target temperature of the fan control (special values: 0 – no control on all cards, 1-4-only monitoring on all cards with an interval of 30-120 seconds, negative values – fixed fan speed (in %)
- -tstop 85 – means that the video card will be suspended when the temperature reaches 85 °
- -tstart 70 – means that the card will start again when its temperature drops to 70 °
- -fanmin 30 – minimum rotation speed of the video card fans. It is recommended to put at least 30 in case MSI Afterburner or other software does not start the equation with fans
- pause – means that if you configure something incorrectly, the miner will not close immediately, but display an error code
Setting up a batch file for dual mining Ethereum (Ethereum + Blake2s)
Starting from 4.0 PhoenixMiner , you can mine two coins at the same time. This is ideal for those with cheap electricity. Dual mode increases the power consumption and heat dissipation of video cards. Currently only the Blake2s algorithm is supported, for example the Verge coin runs on this algorithm.
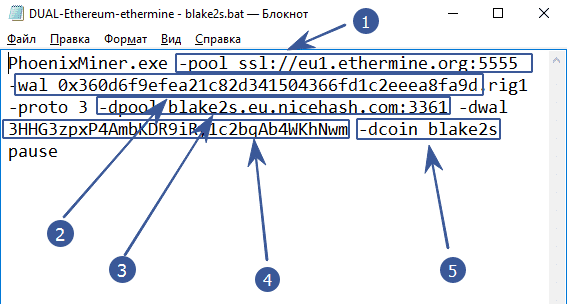
- -pool ssl: //eu1.ethermine.org: 5555 – enter the address of the pool of the first coin. The first (main) coin must necessarily work on the ethash algorithm. It will not work to make another algorithm the main one, as well as the combination of Blake2s + Blake2s
- -wal after the -wal option, enter the address of the digital wallet of the first (main) coin
- -dpool blake2s.eu.nicehash.com:3361 enter the pool address of the second (for dual mining) coin. It must work on the Blake2s algorithm. It will not work to combine in the Ethash + Ethash dual (for example Ethereum and Ethereum Classic)
- -dwal – after the -dwal option, enter the address of the second coin
- The dcoin blake2s option means that you will mine the second coin using the blake2s algorithm. Currently, only this algorithm is supported for dual.
This is where the differences end. For completeness, you can specify additional options as in the example with Ethereum.
This is where the differences end. For completeness, you can specify additional options as in the example with Ethereum.
-tt 75 -tstop 85 -tstart 70 -fanmin 30 -fret 2 -rate 1
In order to save video cards and protect them from overheating and any unforeseen circumstances in case of failure to start the cooler control.
Launching PhoenixMiner
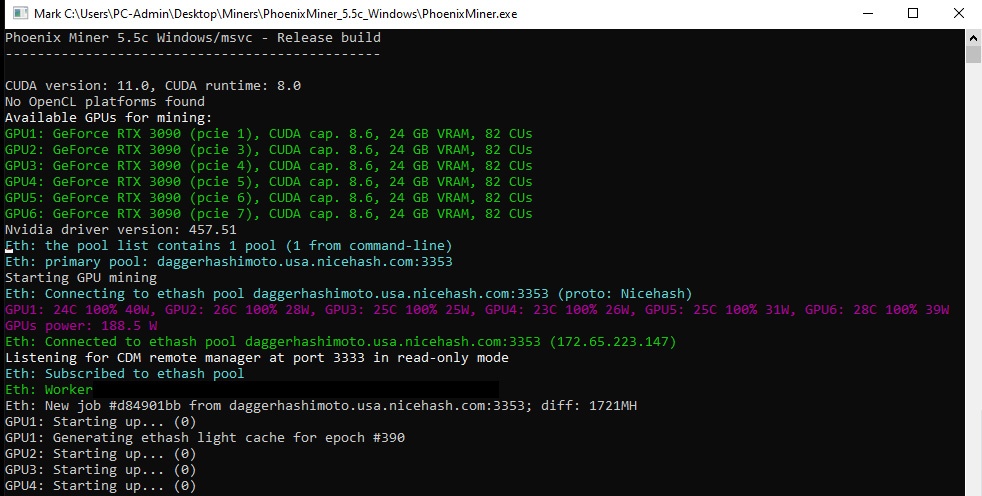
At the first launch, the program will tell us the following information:
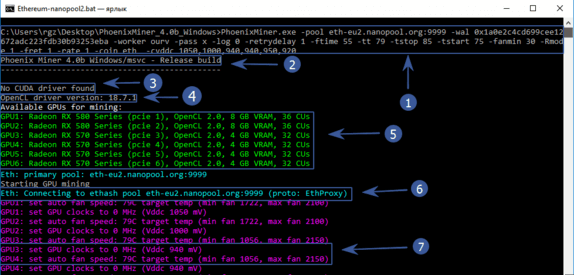
- In the top line there will be everything that we specified in a body shirt
- Program version
- No CUDA driver found – Nvidia driver not found. Because we have AMD, then you should not be afraid of this inscription
- Version of your graphics driver
- All available mining devices
- The program starts connecting to the pool
- Overclocking is set to 0 (we overclocked through afterburener), the core voltage is 940 mV (read about lower power consumption below), the fans of video cards will try to prevent temperatures from 79 ° C.
After waiting a little longer, we finally see the hashrate of the video cards and other data:
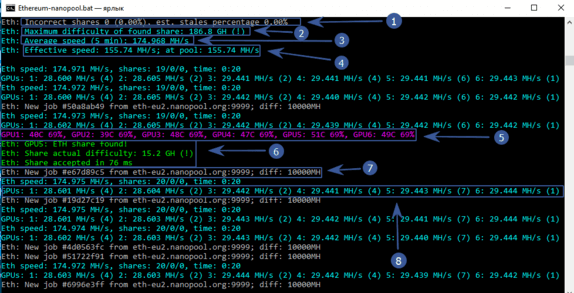
- An incorrectly resolved ball is 0, (0%), an obsolete ball is also 0%. Very well!
- The maximum complexity of the balls found is 186.8 GH
- Average mining speed in 5 minutes – 174 Mh / s
- Effective speed – 155.74 Mh / s. Why is it smaller? Because we have just launched the program and the time of the first launch, DAG file creation, etc. is taken into account. If you wait some time, then this speed will become completely the same with an average speed of 174 Mh / s
- The temperature of each video card and the speed of the fan blades in percent. The color scheme can be changed. See below
- Video card number 5 found the ball. I must say that the miners are paid exactly for the found balls.
- Pool sent a new job and indicated complexity
- Hashrate of each video card separately
We have reviewed the basic settings that will already allow you to start mining. It is recommended to do the first launch with minimal or no overclocking of video cards and test PhoenixMiner for stability.
Ethereum – Ethermine.org
PhoenixMiner.exe -pool eu1.ethermine.org:4444 -wal 0x9147460980c93629e775783148591b7d0a0cbf2d -worker Rig1 -pass x -log 0 -tt 75 -tstop 85 -tstart 70 -fanmin 30 -Rmode 1 -fret 1 -rate 1 -coin eth
pause
Ethereum – sparkpool.com
PhoenixMiner.exe -pool eu.sparkpool.com:3333 -wal 0x9147460980c93629e775783148591b7d0a0cbf2d -worker Rig1 -pass x -log 0 -tt 75 -tstop 85 -tstart 70 -fanmin 30 -Rmode 1 -fret 1 -rate 1 -coin eth
pause
Ethereum – f2pool.com
PhoenixMiner.exe -pool eth.f2pool.com:8008 -wal 0x1a0e2c4cd699cee12672adc223fdb30b93253eba -worker Rig1 -pass x -log 0 -tt 75 -tstop 85 -tstart 70 -fanmin 30 -Rmode 1 -fret 1 -rate 1 -coin eth
pause
Read more:
 PhoenixMiner 5.1c: Download fastest Ethash miner with Low DevFee (Win/Linux)
  PhoenixMiner v5.0e: Download Ethereum (Ethash) GPU miner for Windows & Linux.
  PhoenixMiner 5.2a (AMD/NVIDIA) – Download and Configure for Windows/Linux
  PhoenixMiner 4.2a (Download and Configure) AMD NVIDIA GPUs Miner
  PhoenixMiner v4.9c: Download Ethash Miner for AMD NVIDIA GPU PhoenixMiner v4.5c – AMD+NVIDIA GPU Miner (Download and Configure) Download and Configure PhoenixMiner v5.0b (AMD/NVIDIA GPU miner)