PhoenixMiner 5.2a
New features in this release:
- AMD cards with more than 4 GB RAM will now work without issues until DAG epoch 450
- Added new -daglim parameter to allow a few more weeks of work for 4 GB AMD Polaris cards. Use -daglim 1 for automatic operation, or specify a concrete value for the maximum DAG size (example: -daglim 4000 will set max DAG size 4000 MB)
- Added -rxboost parameter (also accessible via -vmr) to boost the performance of GDDR5 based AMD cards (Polaris or earlier)
- Added memory straps support for AMD Vega cards. Use the -straps command-line option to activate it (example: -straps 1 will activate the lowest strap level)
- The Nvidia memory timing (straps) option is improved and now is turned off during DAG generation to avoid any possible instability issues
- Many other small improvements and fixes
Here are some additional notes about the VRAM timing adjustments of Nvidia 10×0 cards:
- Using -rxboost, -vmr, or -straps on AMD cards requires running as administrator (or as root under Linux), so you need to run PhoenixMiner as administrator for the VRAM timing options to work. Note that the -mt option will still work without running as administrator/root.
- The -rxboost option is only supported on GDDR5 cards (RX4xx/RX5xx or older).
- The -daglim option works only on Polaris cards (RX470, RX480, RX570, RX580, RX590). It limit the DAG size to <n> MB to allow mining on 4 GB cards a few weeks after epoch 373 on Windows (or after 384 on Linux). The possible values are the exact DAG limit in MB, or 0 (turn off the DAG limit, this is the default), 1 (automatic DAG limit size, usually around 4005 MB under Windows). Note that the hashrate will drop significantly with each epoch after the DAG limit is in effect. If the hashrate drops too much (e.g. from 28 MH/s to just 2-3 MH/s, you need to use lower value, for example -daglim 3950
- The VRAM timing options can be quite different between the GPUs, even when the GPUs are the same model. Therefore, you can (and probably should) specify the VRAM timing options separately for each GPU.
Please note that this is an alpha release, we rushed it because the epoch 374 is just a few hours away and because of the problems with DAG epoch 385 on ETC and AMD cards. Please let us know if you have any problems or questions related to PhoenixMiner 5.2a.
IMPORTANT! All owners of AMD cards with 6 GB or 8 GB RAM must either use drivers 20.4.x or lower (do not upgrade to 20.5.1 or later), or upgrade to or later version to continue mining after DAG epoch 384 (ETC has already passed DAG epoch 384, and ETH will pass it in less than two months).
IMPORTANT! All owners of AMD cards with 4 GB RAM must upgrade to or later version to continue mining after DAG epoch 373 (set -daglim 1, or see bellow how to use the -daglim option). Additionally, here are some important tips for longest possible usage of 4 GB AMD cards with PhoenixMiner 5.2a and later:
- After the epoch 373 the hashrate will drop dramatically (to just a few MH/s) because the DAG no longer fits in the card’s VRAM and part of it is stored in the system memory. Use the option -daglim 1 to use only 4006 MB for the DAG buffer. This will allow you to mine for several more weeks with gradually lower hashrate for each passing DAG epoch. If the speed is too low (less than 10 MH/s for epoch 374), you need to use -daglim 4000, or even lower value – keep trying with lower and lower -daglim values until the speed is jumps higher. Note that this value can be different for each card but as a general rule of thumb, if you are able to mine without problems and speed loss on epoch 373, -daglim 1 should work fine.
- Note that -daglim will only work on Polaris GPUs (RX470, RX480, RX570, RX580, RX590), and the is still in alpha stage of testing
Additionally, we would like to read feedback about the new -rxboost option for AMD cards with GDDR5 memory, and the straps for AMD Vega cards.
New version overview
I downloaded a new miner, added -rxboost 1 to the batch file, got a small boost. I did not change any settings. The miner must be run in administrator mode, open the properties of the miner, there must be checked the start as administrator checkbox. In order for everything to work from autorun, you need to turn off the control of accounts, otherwise, at startup, a window will pop up to confirm the launch. No test mode is needed.
Rig 5×588 msi gaming, the core is flashed 1200, the memory of hunix (2140) and samsung (2200). Without a boost, the rig gave out 155mh, consumed 655w from the outlet, with a boost, the rig gave out 162mh, consumption increased by 11 watts, it became 666 watts. The hashrate has grown by 7mx from five cards.
The second rig, 8×588 nitro +, the core is stitched in 1160, the memory is microns (2250). The ninth card is green 1070. It was 283mh, with a boost it became 285. The drivers were updated, the boost is applied, but the gain is very small. Either the core 1160 is not enough, or my hands are crooked, and I have not figured it out. I can’t check the 1200 core, the rig is far from home. As the fours fall off, I will test -daglim, while everything works like that.
there is growth, rxboost 1 (you need to drive the core, at least 1200, otherwise the growth is scanty)
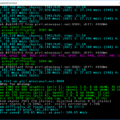
GPU1: Radeon RX 570 Series (pcie 1), OpenCL 2.0, 8 GB VRAM, 32 CUs
GPU2: GeForce GTX 1070 (pcie 2), CUDA cap. 6.1, 8 GB VRAM, 15 CUs
GPU3: GeForce GTX 1070 (pcie 3), CUDA cap. 6.1, 8 GB VRAM, 15 CUs
GPU4: GeForce GTX 1060 6GB (pcie 4), CUDA cap. 6.1, 6 GB VRAM, 10 CUs
GPU5: Radeon RX 580 Series (pcie 5), OpenCL 2.0, 8 GB VRAM, 36 CUs
GPU6: GeForce GTX 1060 6GB (pcie 6), CUDA cap. 6.1, 6 GB VRAM, 10 CUs Eth speed: 170.026 MH/s, shares: 696/19/3, time: 3:22
GPUs: 1: 29.403 MH/s (122) 2: 30.028 MH/s (123/2) 3: 30.032 MH/s (136) 4: 24.621 MH/s (113) 5: 31.270 MH/s (122) 6: 24.673 MH/s (99/1)

Eth speed: 173.327 MH/s, shares: 13/0/0, time: 0:03
GPUs: 1: 30.985 MH/s (1) 2: 30.072 MH/s (1) 3: 30.023 MH/s (4) 4: 24.733 MH/s (3) 5: 32.668 MH/s (2) 6: 24.846 MH/s (2)
the second rig, the last line the core made 1200 on all maps, on 1 and 2 only rxboost 1 ETH - Total Speed: 183.016 Mh / s, Total Shares: 5715 ( 989 + 927 + 982 + 938 + 964 + 915), Rejected: 145 (24 + 29 + 22 + 27 + 24 + 19), Time: 25:31
ETH: GPU0 30.741 Mh / s, GPU1 29.703 Mh / s, GPU2 30.887 Mh / s, GPU3 29.996 Mh / s, GPU4 30.888 Mh / s, GPU5 30.801 Mh / s
Eth speed: 183.957 MH / s, shares: 32/0/0, time: 0 : 06
GPUs: 1: 30.809 MH / s (5) 2: 29.882 MH / s (5) 3: 31.054 MH / s (5) 4: 30.188 MH / s (5) 5: 31.055 MH / s ( 7) 6: 30.969 MH / s (5)
Eth speed: 187.498 MH / s, shares: 23/0/0, time: 0:04
GPUs: 1: 31.154 MH / s ( 4) 2: 30.566 MH / s (2) 3: 31.613 MH / s (5) 4: 31.472 MH / s (2) 5: 31.587 MH / s (6) 6: 31.105 MH / s (4) code >
Instruction manual
- Step 1. Install GPUs and configure your computer.
- Step 2 – Download the latest version of PhoenixMiner
- Step 3 – Get an Ethereum wallet (Mist or MyEtherWallet)
- Step 4 – Join the mining pool.
- Step 5 – Start mining!
Setting up a batch file for Ethereum
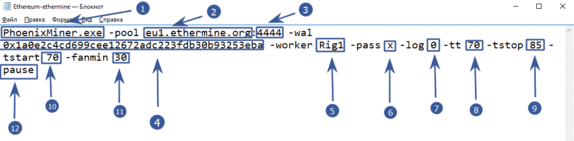
- PhoenixMiner.exe – this key indicates which program will be launched. We leave it as it is
- -pool eu1.ethermine.org – pool server. Change to another pool or leave ethermine
:4444pool port. It is indicated after the colon- -wal is the address of your digital wallet
- -worker Rig1 is the name of your farm worker. Used for the convenience of tracking statistics on the pool. You can specify any
- -pass x – password on the pool. Almost never used on pools. X value means no password
- -log 0 – is responsible for keeping the miner’s event log. 0 – means not to keep the log. If you set -log 1 , then the log will be kept without showing debug messages on the screen, if -log 2 – write the log and display debug messages on the screen
- -tt 70 – setting the target temperature of the fan control (special values: 0 – no control on all cards, 1-4-only monitoring on all cards with an interval of 30-120 seconds, negative values – fixed fan speed (in %)
- -tstop 85 – means that the video card will be suspended when the temperature reaches 85 °
- -tstart 70 – means that the card will start again when its temperature drops to 70 °
- -fanmin 30 – minimum rotation speed of the video card fans. It is recommended to put at least 30 in case MSI Afterburner or other software does not start the equation with fans
- pause – means that if you configure something incorrectly, the miner will not close immediately, but display an error code
Setting up a batch file for dual mining Ethereum (Ethereum + Blake2s)
Starting from 4.0 PhoenixMiner , you can mine two coins at the same time. This is ideal for those with cheap electricity. Dual mode increases the power consumption and heat dissipation of video cards. Currently only the Blake2s algorithm is supported, for example the Verge coin runs on this algorithm.
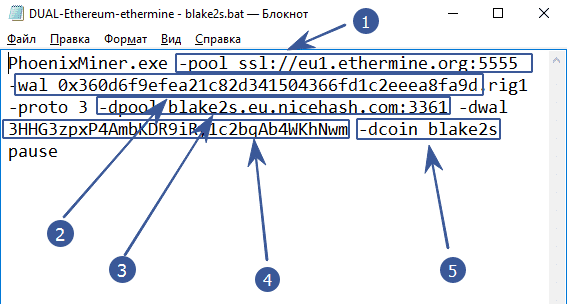
- -pool ssl: //eu1.ethermine.org: 5555 – enter the address of the pool of the first coin. The first (main) coin must necessarily work on the ethash algorithm. It will not work to make another algorithm the main one, as well as the combination of Blake2s + Blake2s
- -wal after the -wal option, enter the address of the digital wallet of the first (main) coin
- -dpool blake2s.eu.nicehash.com:3361 enter the pool address of the second (for dual mining) coin. It must work on the Blake2s algorithm. It will not work to combine in the Ethash + Ethash dual (for example Ethereum and Ethereum Classic)
- -dwal – after the -dwal option, enter the address of the second coin
- The dcoin blake2s option means that you will mine the second coin using the blake2s algorithm. Currently, only this algorithm is supported for dual.
This is where the differences end. For completeness, you can specify additional options as in the example with Ethereum.
This is where the differences end. For completeness, you can specify additional options as in the example with Ethereum.
-tt 75 -tstop 85 -tstart 70 -fanmin 30 -fret 2 -rate 1
In order to save video cards and protect them from overheating and any unforeseen circumstances in case of failure to start the cooler control.
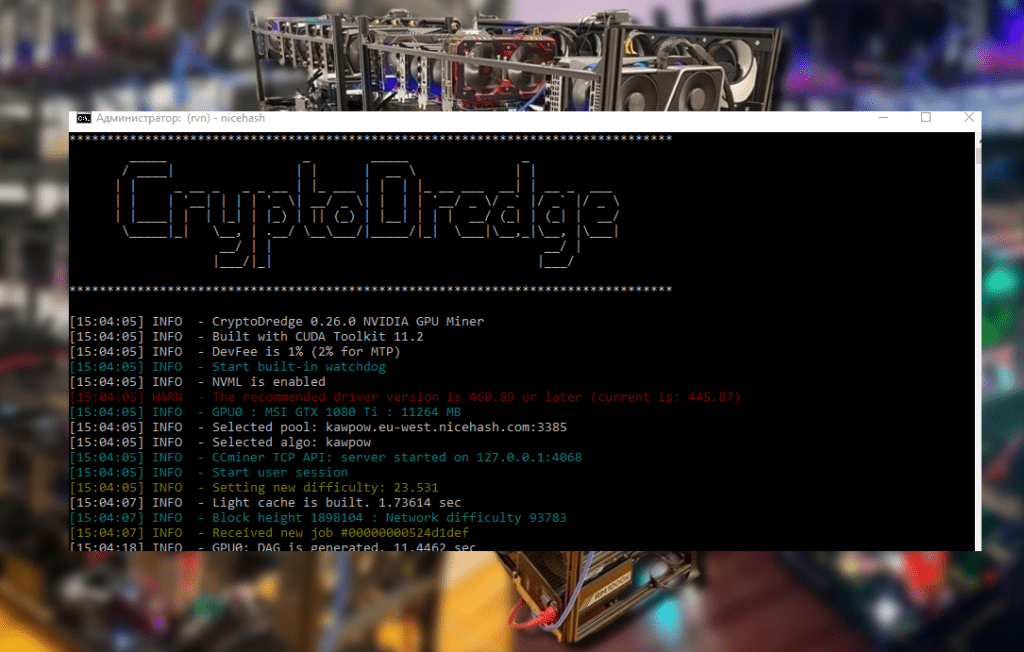
Launching PhoenixMiner
At the first launch, the program will tell us the following information:
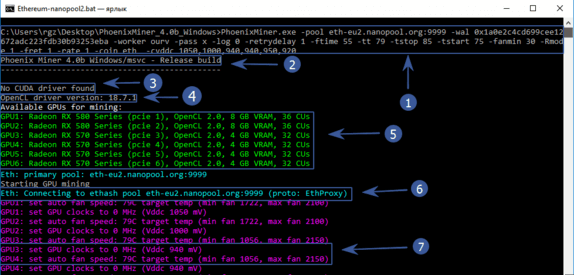
- In the top line there will be everything that we specified in a body shirt
- Program version
- No CUDA driver found – Nvidia driver not found. Because we have AMD, then you should not be afraid of this inscription
- Version of your graphics driver
- All available mining devices
- The program starts connecting to the pool
- Overclocking is set to 0 (we overclocked through afterburener), the core voltage is 940 mV (read about lower power consumption below), the fans of video cards will try to prevent temperatures from 79 ° C.
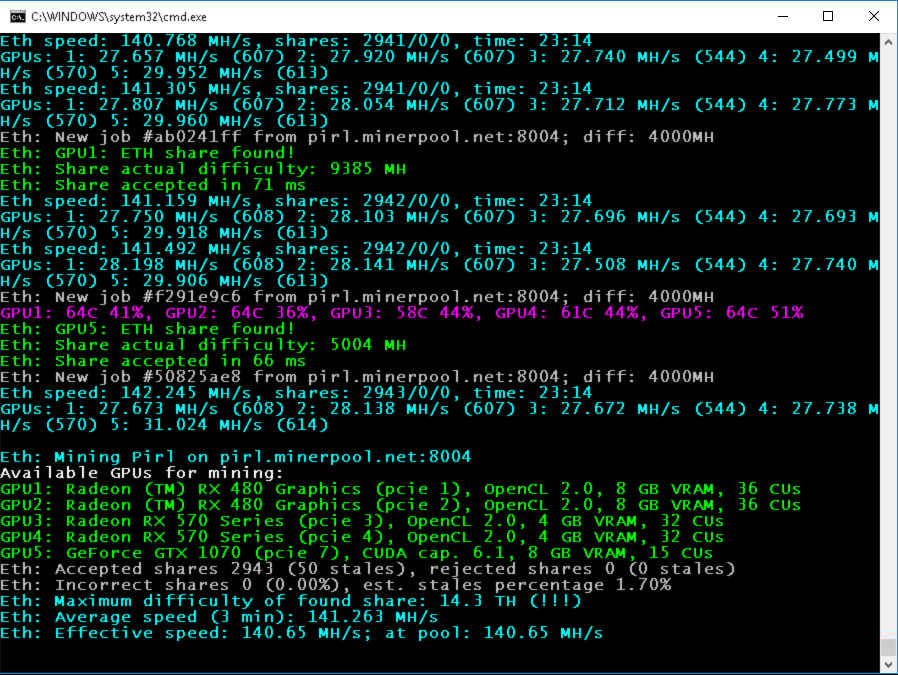
After waiting a little longer, we finally see the hashrate of the video cards and other data:
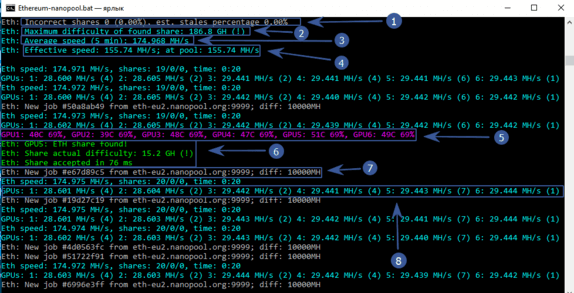
- An incorrectly resolved ball is 0, (0%), an obsolete ball is also 0%. Very well!
- The maximum complexity of the balls found is 186.8 GH
- Average mining speed in 5 minutes – 174 Mh / s
- Effective speed – 155.74 Mh / s. Why is it smaller? Because we have just launched the program and the time of the first launch, DAG file creation, etc. is taken into account. If you wait some time, then this speed will become completely the same with an average speed of 174 Mh / s
- The temperature of each video card and the speed of the fan blades in percent. The color scheme can be changed. See below
- Video card number 5 found the ball. I must say that the miners are paid exactly for the found balls.
- Pool sent a new job and indicated complexity
- Hashrate of each video card separately
We have reviewed the basic settings that will already allow you to start mining. It is recommended to do the first launch with minimal or no overclocking of video cards and test PhoenixMiner for stability.
Ethereum – Ethermine.org
PhoenixMiner.exe -pool eu1.ethermine.org:4444 -wal 0x9147460980c93629e775783148591b7d0a0cbf2d -worker Rig1 -pass x -log 0 -tt 75 -tstop 85 -tstart 70 -fanmin 30 -Rmode 1 -fret 1 -rate 1 -coin eth
pause
Ethereum – sparkpool.com
PhoenixMiner.exe -pool eu.sparkpool.com:3333 -wal 0x9147460980c93629e775783148591b7d0a0cbf2d -worker Rig1 -pass x -log 0 -tt 75 -tstop 85 -tstart 70 -fanmin 30 -Rmode 1 -fret 1 -rate 1 -coin eth
pause
Ethereum – f2pool.com
PhoenixMiner.exe -pool eth.f2pool.com:8008 -wal 0x1a0e2c4cd699cee12672adc223fdb30b93253eba -worker Rig1 -pass x -log 0 -tt 75 -tstop 85 -tstart 70 -fanmin 30 -Rmode 1 -fret 1 -rate 1 -coin eth
pause
Read more:
 PhoenixMiner 5.1c: Download fastest Ethash miner with Low DevFee (Win/Linux)
  PhoenixMiner v5.0e: Download Ethereum (Ethash) GPU miner for Windows & Linux.
 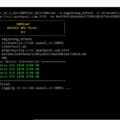 NBMiner v33.4 (NVIDIA & AMD GPU Miner for ETH, RVN, GRIN, BEAM) NBMiner v32.1: Download GPU Miner ETH, RVN, GRIN, BEAM, AE, BTM, SERO, HNS, BFC
  Mining Ethereum in on GPU and ASIC