
Claymore’s Dual v15.0
Claymore Dual v15.0 (AMD & Nvidia) – designed for mining with AMD and Nvidia video cards, which mine the popular cryptocurrencies Ethereum (ETH) and Monero (XMR). In this article below, you can download and configure the Claymore Dual v15.0 miner.
Claymore is one of the most efficient and convenient miners to date, so it has gained widespread recognition of miners.
The Monero coin (XMR), as well as the cryptonight algorithm (CryptoNote), is gaining popularity, and sometimes it becomes very profitable for mining. So take on arms.
Changes v15.0:
- Now the miner supports up to # 384 epoch (4GB DAG size). Please note that previous versions support up to # 299 epoch, you will not be able to use older versions after # 299 epoch.
- Added support for Navi maps (ETH only mode).
- Now the miner automatically sets environment variables (required for AMD cards with a capacity of 4 GB).
- A few minor fixes and improvements.

Claymore Dual
Features, requirements and limitations:
- Highly optimized OpenCL and CUDA cores for maximum mining speed
- Official support for Windows / Linux.
- Nicehash support.
- Automatic GPU setup.
- Supports AMD Vega, 580/570/480/470, 460/560, Fury, 390/290 and older AMD GPUs with ample video memory;
- Support for the Nvidia 10×0 and 9×0 series, as well as older cards with enough video memory;
- Additional “green” cores for RX580 / 570/560/480/470/460 to reduce power consumption by 2-3% with little or no decrease in hashing speed;
- The lowest development fee of 1% (canceling mining by 35 seconds for every 90 minutes)
- Dual mining;
- Extended statistics: the actual complexity of each stock, the effective hash in the pool and optional display of the estimated income in US dollars.
- Generation of DAG files in the GPU for faster starting and switching eras of DAG;
- Supports all ethash mining pools and stratum protocols
- Watchdog, which tracks your GPU threads, if they stop hashing for several minutes, the miner restarts itself;
- The launch monitor, if the miner cannot start the GPU and start mining after a certain time, restarts itself or runs a user script;
- Monitoring the temperature of the GPU and, if a critical temperature is reached, this particular GPU is turned off until it cools down;
- Set the system shutdown temperature to protect your GPUs from overheating;
- API for monitoring a rig.
Configure Claymore Dual
Step 1: Download the Miner
Unzip the Claymore archive to any location on your computer. In the folder containing the miner, you must create a file with the extension .bat. You can do this in any text editor (e.g. Notepad). When you save a file, it is important to select “All Files” as the file type, not “txt”. Otherwise, you will have a .bat.txt file at the end of the file name, and the miner will not be able to open this file. Your .bat file (say, it is called test1.bat) should contain the following text (step 2):
Attention! For security reasons, Windows may prevent you from opening the bat file. In this case, you must allow it to open in a popup window.
Step 2: View the batch file to launch Claymore Miner
setx GPU_FORCE_64BIT_PTR 0
 setx GPU_MAX_HEAP_SIZE 100
 setx GPU_USE_SYNC_OBJECTS 1
 setx GPU_MAX_ALLOC_PERCENT 100
 setx GPU_SINGLE_ALLOC_PERCENT 100
 EthDcrMiner64.exe -epool eu1.ethermine.org:4444 -работник YOUR_RIG_NAME -ewal YOUR_WALLET ADDRESS -epsw x
Step 3: configure the miner with your settings
WALLET_ADDRESS – enter your Ethereum wallet address (exactly so, Claymore Miner knows where to place your broadcast) RIG_NAME – you can choose any name (for example, a test), but do not exaggerate: it should be no more than 32 characters, contain only letters and numbers (without special characters such as $% “*; @).
Step 4: Start Mining
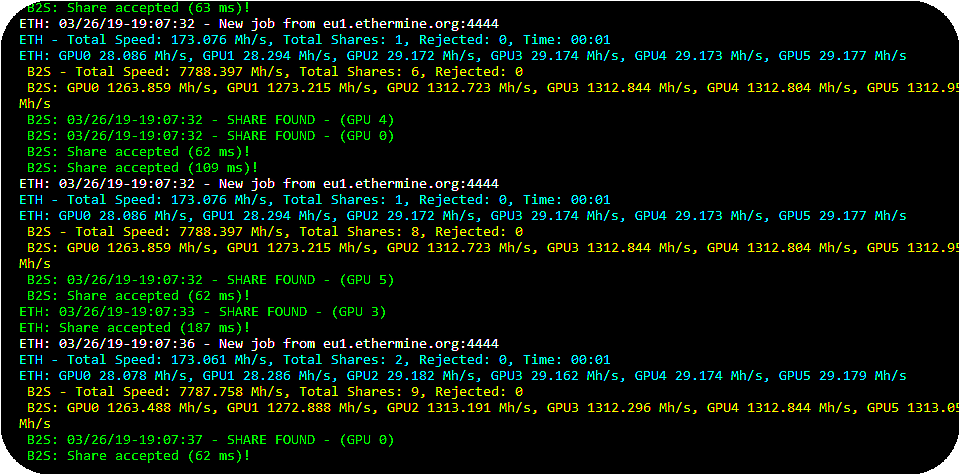
Double-click the .vat file to start the miner. The miner will start, run the setx commands for setting these environment variables, initializes each of your GPUs will create a DAG file on each of your GPUs processors and will begin to hash. Let it run for about 20 seconds, and then press “s” to display your hash rate. If you have completed the steps above, you should see this screen.
1) Ethereum –
EthDcrMiner64.exe -pool eu1.ethermine.org:4444 -wal 0x9147460980c93629e775783148591b7d0a0cbf2d -worker Rig1 -pass x -log 0 -tt 75 -tstop 85 -tstart 70 -fanmin 30 -Rmode 1 -fret 1 -rate 1
pause
2) Ethereum –
EthDcrMiner64.exe -pool eu.sparkpool.com:3333 -wal 0x9147460980c93629e775783148591b7d0a0cbf2d -worker Rig1 -pass x -log 0 -tt 75 -tstop 85 -tstart 70 -fanmin 30 -Rmode 1 -fret 1 -rate 1
pause
3) Ethereum –
EthDcrMiner64.exe -pool eth.f2pool.com:8008 -wal 0x1a0e2c4cd699cee12672adc223fdb30b93253eba -worker Rig1 -pass x -log 0 -tt 75 -tstop 85 -tstart 70 -fanmin 30 -Rmode 1 -fret 1 -rate 1
pause
Claymore Miner auto-reboot setup:
On Windows, if you configured the miner using a batch file, you can easily make a script for the loop with this simple command.
your miner configuration goes here
goto start`
Example:
:start
EthDcrMiner64.exe -pool eth-eu2.nanopool.org:9999 -wal 0x1a0e2c4cd699cee12672adc223fdb30b93253eba -worker Rig1 -pass x -log 0 -tt 75 -tstop 85 -tstart 70 -fanmin 30 -Rmode 1 -fret 1 -rate 1
goto start
Read more:
 PhoenixMiner 5.1c: Download fastest Ethash miner with Low DevFee (Win/Linux)
  PhoenixMiner v5.0e: Download Ethereum (Ethash) GPU miner for Windows & Linux.
  AwesomeMiner (Crack): Download CPU/GPU/ASIC/FPGA Miner for Windows/Linux
 ![XMRig v6.3.0 [CPU/GPU miner RandomX, KawPow, CryptoNight, AstroBWT, Argon2]](https://cool-mining.org/wp-content/uploads/2020/08/xmrig-5-1-0-kopiya-120x120.jpg) XMRig v6.3.0: CPU/GPU miner RandomX, KawPow, CryptoNight, AstroBWT, Argon2
XMRig v6.3.0: CPU/GPU miner RandomX, KawPow, CryptoNight, AstroBWT, Argon2  NBMiner v33.4 (NVIDIA & AMD GPU Miner for ETH, RVN, GRIN, BEAM)

I read this piece of writing completely regarding the resemblance of most recent and preceding technologies, it’s amazing article.