TT-Miner – A program for video cards of the Nvidia family. Supports three hashing algorithms. Mainly used for mining on KAWPOW, ProgPoW, MTP, EPIC, ETHASH & ETCHASH.
Changes in v6.1.0:
New version of TT-Miner release, including ETCHASH. Those who are mining ETC are advised to upgrade TT. TT will automatically use ETCHASH after the fork. Just remember to add -coin ETC to the command line.
Features of TT-Miner:
- farm management from one computer
- GPUs performance monitoring
- Hashrate / s performance rating
- switching a farm or just one video card to other pools or another coin in a few seconds
- low memory and processor power
- Supports CUDA 9.2 and CUDA 10.0
Supported Algorithms:
- PROGPOW (Zano, Sero & EPIC, Veil)
- KAWPOW (Raven, Zelantus)
- ETHASH (ETH, Music, Callisto, etc)
- ETCHASH (ETC)
- UBQHASH (UBIQ)MTP (Zcoin, Tecra)
System requirements:
In the current version, the miner supports cuda 9.2, 10.0, 10.1, 10.2 and 11.0. If you want to make sure that TT-Miner uses a specific version of cuda, add one of these values, if you do not add any of them, the miner will always use the algorithm for the latest version of cuda:
-92 for cuda 9.20 (ETHASH-92, UBQHASH-92)
-100 for cuda 10.00 (ETHASH-100, PROGPOW-100)
-101 for cuda 10.10 (ETHASH-101, MTP-101)
-102 for cuda 10.20 (ETHASH-102, MTP-102)
-110 for cuda 11.00 (ETHASH-110, MTP-110)
Please note the following requirements for different Cuda Toolkit releases:
Cuda-Toolkit Linux Windows
CUDA 11.0.189 RC >= 450.36.06 >= 451.22
CUDA 10.2.89 >= 440.33 >= 441.22
CUDA 10.1.105 >= 418.39 >= 418.96
CUDA 10.0.130 >= 410.48 >= 411.31
CUDA 9.2.148 >= 396.37 >= 398.26
You might need the latest C ++ for beta 6 if you see VCRUNTIME140_1.dll missing:
Configure TT-Miner
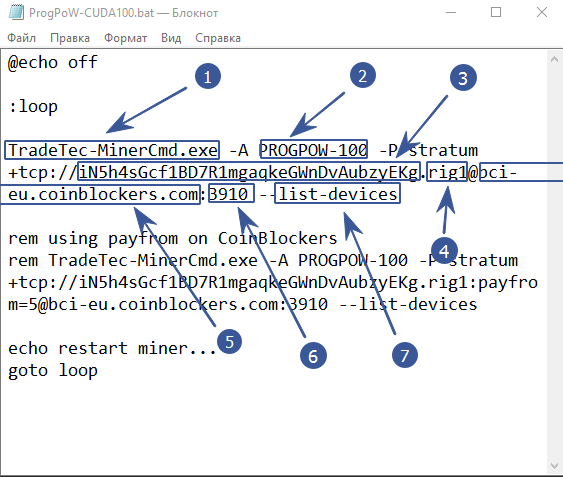
- TradeTec-MinerCmd.exe – indicate in the batch file which program we want to run. This file should be located in the same folder as our batch file
- PROGPOW-100 – specify the algorithm of the coin we are going to mine
- iN5h4sGcf1BD7R1mgaqkeGWnDvAubzyEKg – after the construction -P stratum + tcp: // specify the address of our digital wallet. You can take it on the exchange on which the coin is traded, or install a cold wallet
- rig1 – after we have entered the wallet address, put a full stop and indicate the name of our farm. Anyone can be used. This is needed to track statistics on the pool.
- bci-eu.coinblockers.com – after the @ sign, indicate the pool address. A good pool can be selected here
- 3910 specifying the address of the pool, put a colon and indicate the port of the pool
- –list-devices – the command will display all available devices for mining
Start mining
So we set up the program for the first launch. How to run it? The cryptocurrency mining process is launched by double-clicking on the created or edited batch file (file with the .bat extension). So, we launch and look at what the program console writes to us.
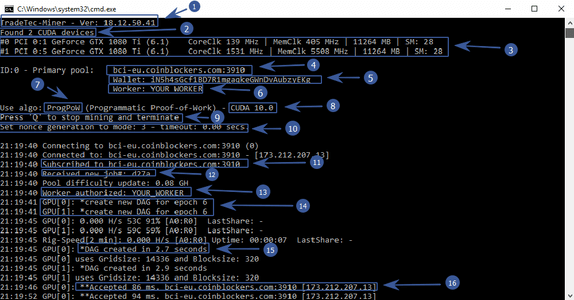
- TradeTec-Miner – the program reports the installed version
- Found 2 CUDA devices – two devices available for mining
- # 0 PCI 0: 1 GeForce GTX 1080 Ti (6.1) CoreClk 139 MHz | MemClk 495 MHz | 11264 MB | SM: 28 – name of the video card, overclocking of its core and memory, available video memory
- bci-eu.coinblockers.com:3910 – the pool that we specified in the batch file
- iN5h4sGcf1BD7R1mgaqkeGWnDvAubzyEKg – the address of the wallet to which the mined coins will be sent
- YOUR WORKER – farm name (you can leave it blank)
- Use algo: ProgPoW (Programmatic Proof-of-Work) – we specified the ProgPoW algorithm
- CUDA 10.0 – the cuda architecture on which video cards run
- Press ‘Q’ to stop mining and terminate – if you press the Q key in the active miner window, the program will close
- Set nonce generation to mode: 3 – timeout: 0.00 secs . – nonce parameter is set to mode 3. More on this below
- Subscribed to bci-eu.coinbiockers.com:3910 – we were able to connect to the pool
- Received new job #: d27a – the pool has sent a new job for video cards
- Pool difficulty update: 0.08 GH – the pool set the difficulty to 0.08 GH. You can find a convenient capacity calculator here
- Worker authorized: YOUR WORKER – we are authorized on the pool
- create new DAG for epoch 6 – DAG file is generated for mining. Gotta wait a bit
- DAG created in 2.7 seconds – DAG file was created in 2.7 seconds
- Accepted 86 ms. bci-eu.coinbiockers.com:3910 – the pool made a decision (ball) from our video card. Miners are paid exactly for the number of resolved shares.
Example batch file:
@echo off

:loop

TradeTec-MinerCmd.exe -A PROGPOW-100 -P stratum+tcp://iN5h4sGcf1BD7R1mgaqkeGWnDvAubzyEKg.rig1@bci-eu.coinblockers.com:3910 --list-devices

rem using payfrom on CoinBlockers
rem TradeTec-MinerCmd.exe -A PROGPOW-100 -P stratum+tcp://iN5h4sGcf1BD7R1mgaqkeGWnDvAubzyEKg.rig1:payfrom=5@bci-eu.coinblockers.com:3910 --list-devices

echo resta
Ready .bat files:
Configure TT-Miner via GUI
The program can also be configured through the graphical interface of the miner.
Add new pool
When starting TradeTec-MinerControl.exe , the first thing to do is to configure the pools. Run TradeTec-MinerControl.exe and activate the “Edit” – & gt; “Add new pool …”. A new dialog box will appear where you can enter all the necessary information such as server / port and username / password or wallet address.
Click Add Pool and it will appear in the Available Pools window.
Here are some guidelines on what to enter in the field to get the new coin / pool configuration working.
- Name: a unique name for your new coin / pool configuration.
- Algorithm : Select the required algorithm for mining the coin. At the moment, you can choose Ethash, ProgPoW and Ubqhash (later, apparently, there will be MTP as well).
- Server : enter the connection information: server and required port to connect to your pool. The stratum + tcp prefix is not required as TradeTec uses an algorithm to automatically detect the protocol being used.
- Wallet / User: in most cases, you enter the address of your wallet. If your pool first requires a login, you must enter your username for this pool. Password: can be left blank for most pools. If your pool requires a login (suprnova), then you need to enter a password for your worker.
- Password: can be left blank for most pools. If your pool requires a login (suprnova), then you need to enter a password for your worker.
- Worker override : can be left blank in most cases. If you enter a worker’s name here, it will replace “farm name”. In this case, all farms will use this working name. If you are using suprnova it is recommended that you enter the worker name that you use in the suprnova runtime configuration.
So a sample configuration for ETC on ethermine.org would look like this:
Name: My ETC Ethermine config (POOL)
Algorithm: Ethash (Dagger-Hashimoto)
Server: eu1-etc.ethermine.org
Port: 4444
Wallet / User: 'YOUR wallet ADDRESS'
Suprnova BCI Mining:
Name: My config BCI Suprnova (POOL)
Algorithm: ProgPoW
Server: bci.suprnova.cc
Port: 9166
Wallet / User: 'your worker on the suprnova pool'
Password: 'your pool worker password'
Worker override: 'name of the worker on the pool'
To make things easier, the miner will now extract the required information from the regular pool and server string. If you paste this line into the server field “stratum + tcp: //solo-bci.altpool.pro: 2242”, the miner will extract the information it needs: server address and port number. This will also remove the information about the stratum service.
Add video cards
The next step is to add your graphics cards. Go to “Edit” -> “Add new rig …”. Now a dialog will appear to add an IP / port pair. Enter the information to allow the software to connect to the farm. If you run Miner and MinerControl in the same window, then you can use the loopback address (127.0.0.1) and the default port 8010 if this is acceptable to you. Otherwise enter the IP of the farm.
You should now run the TradeTec-Miner.exe software. You will see a window with information. Let’s go from top to bottom:
- Pool information: name, server / port job ID, and performance data
- GPU information: type, memory, overclocking, temperature, fans, cuda version and performance data related to the selected GPU
- Setting for MinerControl : the selected IP interface, port and button to establish a connection between MinerControl and Miner. Also you can choose whether this interface is activated by default or not.
- Miner settings: hostname, default worker name, duration of mining and button to start. This allows you to control the miner even without the MinerControl software. You can also configure the parameter by which the program can start mining if it starts.
- The last section shows a list of installed and available cuda devices with some information: model, pool used for mining, current mining speed for this device, sent and rejected shares, and last share sent time.
If you enable the control interface (click “Start listen”), MinerControl should connect to the miner. You can now proceed with the configuration using the MinerControl software.
GPU Pool Assignment
If MinerControl and Miner are connected, you can see the list of available GPUs in the Management Software.
In the window “GPUs installed on selected Rig” you will see a list of your video cards. You can also see that there are no pools assigned to them. Just click on the box that says “Unassigned – not used” and a list will open with your available pool configurations. Select the pool you want to use for your GPU.
Start mining
You can now start mining by right-clicking on the farm in the Available Rigs window and clicking start mining in the context menu.
You should see a miner reflecting your commands. Since ETHASH works with DAG files, it will take about 20 seconds until you see the mining process and speed.
Read more articles about cryptocurrencies and mining at COOL-MINING.ORG.
Do you like to read similar articles about cryptocurrencies and mining, do you want to support me as an author or ask questions? Be the first to know the news, subscribe to my telegram channel
Read more:
 Download TT-Miner v3.2.0 (Nvidia GPU miner)
 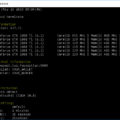 TT-MINER v3.0.5 (Nvidia GPU miner) DOWNLOAD
 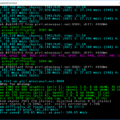 PhoenixMiner 5.1c: Download fastest Ethash miner with Low DevFee (Win/Linux)
  PhoenixMiner v5.0e: Download Ethereum (Ethash) GPU miner for Windows & Linux.
 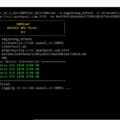 NBMiner v33.4 (NVIDIA & AMD GPU Miner for ETH, RVN, GRIN, BEAM)