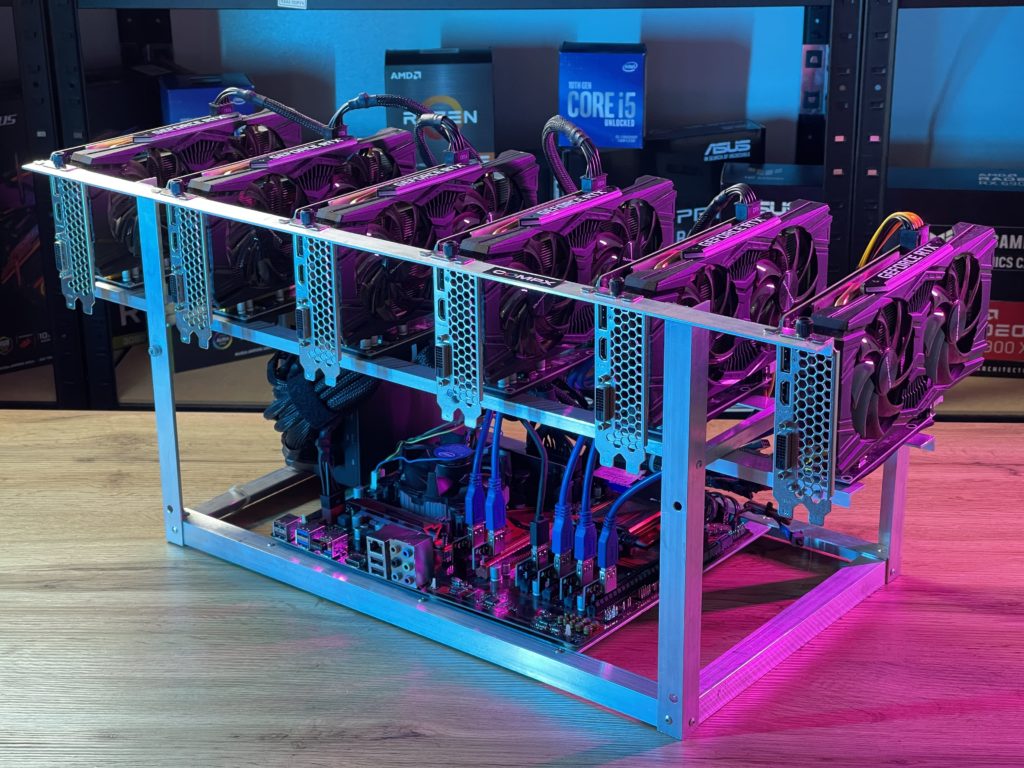
One of the fastest miners for Equihash is MiniZ. miniZ supports Equihash and mining Ethash, ProgPoW, KawPoW, Octopus. Suitable for Nvidia video cards, which are also called “green”, and the miner also supports “red” AMD video cards.
Developer fee:
- Equihash: 2.0%.
- ProgPoW: 1%.
- Ethash: 0.75%
% of mining time.
The program is compatible with Windows and Linux operating systems, and also supports most mining pools. There is also a developer commission – it is 2 percent. By the way, in Funakoshi 144.5 Cuda Miner it is four times lower and is 0.5 percent.
MiniZ Features.
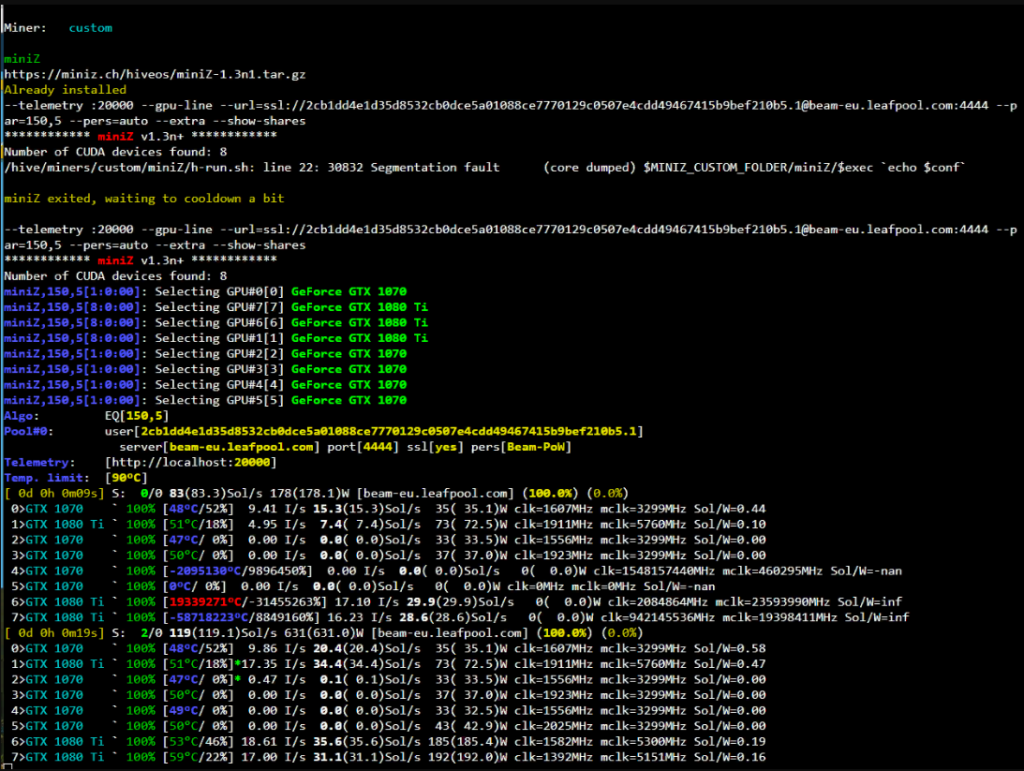
1) Information is conveniently displayed in the miner’s console.
2) Convenient output of information and telemetry in any browser window.
2) Supports cards with video memory up to 2 GB.
The program works with Equihash algorithms: 125.4, 144.5, 150.5, 150.5.3, 192.7, 210.9 and 96.5. The number of supported coins is 22. Here they are:
- (BTG);
- (BTCZ);
- (ZEL);
- Anonymous (ANON);
- (XSG);
- Bithereum (BTH);
- BZEdge (BZE);
- LitecoinZ (LTZ);
- Bitcoin RM (BCRM);
- (SAFE);
- Zero (ZER);
- Genesis (GENX);
- Vidulum (VDL);
- ZeroClassic (ZERC);
- Arrow (ARW);
- Ycash (YEC);
- Zclassic (ZCL);
- Beam (BEAM);
- Grimm (GRIMM);
- Litecash (CASH);
- Aion (AION);
- (MNX).
Changes miniZ v2.0
- Fixed most problems with progpow/ethash.
- Improved invalid shares on CFX.
- Improved stability.
- Improved fan.
- Added –autoclocks option to apply auto clock settings. *
- Added –priority option to set miniZ process priority. *
- Added parameter –stocksettings to set default settings. *
- Fixed issues with invalid shares.
- We’ve fixed most issues with progpow/ethash.
- Additional options have been added, such as the –autoclocks option to apply predefined overclock settings.
Requirements to get started.
Video cards:
The application supports all video card architectures, including Kepler, Maxwell, Pascal and Turing.
Equihash algorithms 144.5 and 96.5 require about 2 GB of memory to run, however, because the Windows driver typically consumes a lot of memory, 2 GB graphics cards may run slower on Windows than on Linux.
The Equihash 192.7 algorithm requires 2.7 GB of RAM. Please comment below if you are having issues with any of these graphics cards.
Requires the current driver version that supports your GPU. For example, for Turing GPUs, you will need driver 411.31 or 410.48 (or later for Linux) (or later for Windows).
Operating systems (x64):
For Linux and Windows, the miniZ miner was built using cuda 8.0 and cuda 10.0.
1) Windows 7 and 10 are compatible. 2) Linux distributions: 16.04 LTS, 17.10, 18.04 and ZhashOS R3 were tested on Ubuntu.
Software:
To get started you will need:
1) Mining program – see the first step below.
2) MSI Afterburner, overclocking software. It has excellent power and temperature control, which is critical to protecting your graphics cards and maximizing hashrate.
3) Evaluate the overclocking setting.
Power limit (power consumption): 65% to 75%, (we have a hot room)
Temperature limit: 70 degrees Celsius. See here and here for safe temperature ranges.
Core clock (core overclock): +150 to +200;
Memory clock (+500, +700): memory overclock
With these settings, the Nvidia GTX 1080 TI performed well.
Miner setup.
Step 1 – Download the program
Unzip this software after downloading it.
The program folder will contain the .bat files that are used to run it. The pool and the coin are indicated in the file name. You must set up the wallet in this file to look like you. Help – a help document that lists all available commands (in English). A folder with the algorithm configuration (if you want to mine using the settings) and our translation of the instruction into Russian.
Step 2 – Choose a Pool
You can select a pool using the pool rating and pool power statistics websites.
Some pools require registration for mining.
Step 3 – Setup
Virtual Memory in Windows
A farm of 6 cards will need at least 27 GB for various algorithms, which means that before running miniZ, you need to increase the virtual memory in Windows to at least 4.5 GB (ideally 5 GB) x (Number of cards).
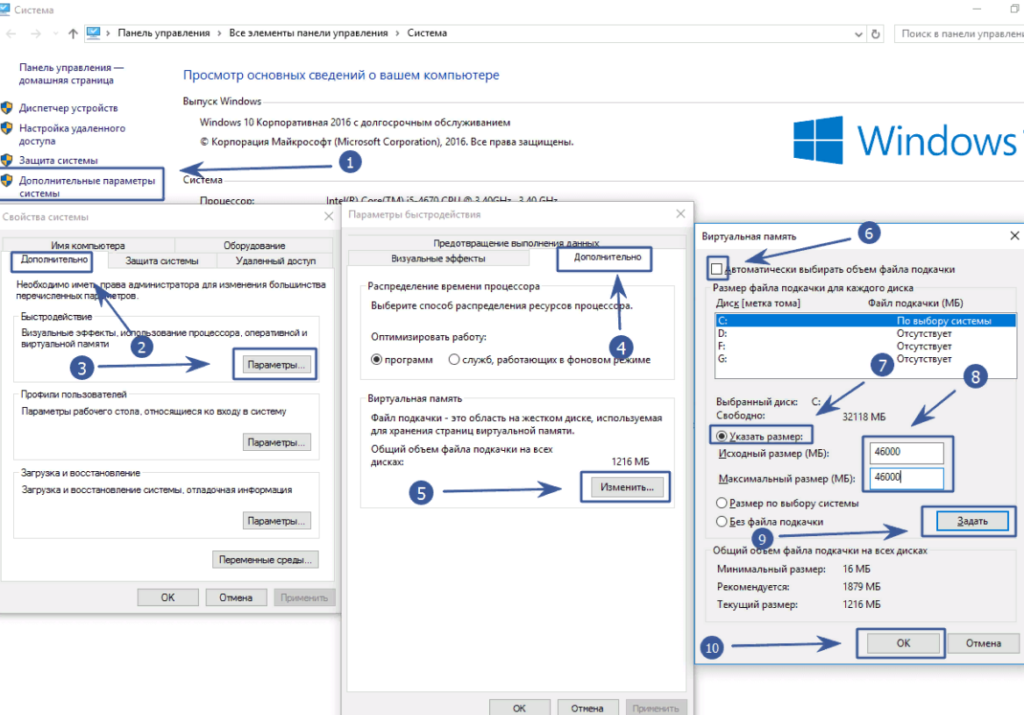
All Control Panel Items in Control Panel. Advanced system settings for System, then “Options” and then another “Advanced” tab.
Click “Change” after finding the virtual memory settings. Check the box next to “Specify size” and uncheck the box next to “Automatically choose paging file size”. Specify the required size in MB (example for 6 cards – 45000). Select “Install” from the menu. Restart your PC or farm.
Now we have to set up the .bat file.
Important! Pay attention to the syntax of the file. Line breaks, extra spaces and symbols are not allowed in inappropriate places. Just follow the lead and you’ll be fine!
.bat file setup

1) :loop – refers to a loop that causes the miner to resume work in case of a crash.
2) .\miniZ.exe – defines the application to be launched.
3) –url=ssl://2d1f865b393afa3ead1e0dd0c0307c0cbcdb8412671c86fbd0b21cfe5328b608ca5 – Enter your bitcoin wallet address after –url=ssl:/. In this case, we write without SSL if the pool does not support it (see examples below).
4) .worker – Be sure to add a period and the name of the employee after the wallet address (farm ID, you can specify any word, for example “1080 TI”).
5) @beam-eu.leafpool.com:3333 – The “@” character and the pool address are placed after the worker process, followed by a colon and the pool port. On the site where the pool is located, you can find the URL and port.
6) –read-config algo/150,5.json – defines the algorithmic device.
7) –log – allows you to log errors. When mining is unstable, it can be profitable. If everything is in order, it is preferable to disable it (remove the command) rather than rebooting the SSD drive.
8) –extra – allows you to view fundamental data in the miner’s console (more details below).
9) –templimit=79 – allows you to control the maximum temperature of video cards.
10) timeout /t 3 – Set a short wait before the miner starts. When you have it set to start mining automatically at system startup, this is beneficial as it gives MSI Afterburner time to initialize, adjust the fans, and overclock before the miner kicks in.
11) goto loop – starts a loop to automatically start the miner in case of a console error.
Examples:
Ethereum — Binance pool
:loop
.\miniZ.exe -algo ethash --url=username1@ethash.poolbinance.com:8888
timeout /t 3
goto loop
Ethereum on the ethermine pool
:loop
.\miniZ.exe -algo ethash --url=0x3aa3e06C47caDEf96202D378aB7C407CF46A36A4@eu1.ethermine.org:4444
timeout /t 3
goto loop
Kawpow и nicehash
:loop
.\miniZ.exe --algo kawpow --url=3HHG3zpxP4AmbKDR9iRy1c2bqAb4WKhNwm@kawpow.eu.nicehash.com:3385
timeout /t 3
goto loop
Ravencoin on 2miners pool
:loop
.\miniZ.exe --url=RKAeArXkWLNERjWo5YF3R1xFnYCwKf11sX.Worker@rvn.2miners.com:6060 --log --extra --mode=x --templimit=79
timeout /t 3
goto loop
More customization examples
On the leafpool, we got the following batch file for the Beam coin:
:loop
.\miniZ.exe --url=ssl://2d1f865b393afa3ead1e0dd0c0307c0cbcdb8412671c86fbd0b21cfe5328b608ca5.worker@beam-eu.leafpool.com:3333 --read-config algo/150,5.json --log --extra --templimit=79
timeout /t 3
goto loop
Btcz on darkfibermines pool:
:loop
:loop
.\miniZ.exe --url=t1az7JfVNZE59rf684VAcueP1ewBhc2wKYy.Worker@142.4.211.28:4000 --templimit=79
timeout /t 3
goto loop
Aion on the aionpool.tech pool:
:loop
.\miniZ.exe --url 0xa08dbd7021784660d19bdbed3996cd5972b38ce1d39b3731a0cc1b09bb7a1625.Worker@cluster.aionpool.tech:3333 --read-config algo/210,9.json --log --extra --pass minpayout=1 --pers AION0PoW --templimit=79 --mode=x
timeout /t 5
goto loop
BTG on 2miners pool:
:loop
.\miniZ.exe --url=GVr7FR4oPda8YstV8YYQ5x4u2L4ww48jKG.worker@btg.2miners.com:4040 --log --extra --templimit=79
timeout /t 3
goto loop
Snowgem on the Equihub pool:
:loop
.\miniZ.exe --url=s1k8V7k6gYnMNVavYDbNbpCnuWfYwcdP37P.Worker@eu1.equihub.pro:3033 --pass minpayout=5 --pers sngemPoW --log --extra --templimit=79
timeout /t 3
goto loop
Ycash on luxor pool:
:loop
.\miniZ.exe --par 192,7 --url=s1ddjEF7gw9PQ97yjUDv5Z3mJ2Nx5H54LrW.Worker@yec-eu.luxor.tech:6655 --read-config algo/192,7.json  --log --extra --templimit=79
timeout /t 3
goto loop
Flux on the coinblockers pool:
:loop
.\miniZ.exe --url=t1goy4DEBDHnzCKim9JYEUxmdUPSypesYD2.Worker@zel-eu.coinblockers.com:4446 --log --extra --mode=x --templimit=79
goto loop
Zero on the Equipool pool:
:loop
.\miniZ.exe --url=t1PPfWixXLp2XTLnZ5ud8WMPNCQLTFX8PWX.Worker@mine-zer-euro.equipool.1ds.us:50021 --log --extra --mode=x --templimit=79
timeout /t 3
goto loop
The basic program instructions for joining a pool and starting bitcoin mining have been revised. A complete list of all available instructions is below; however, we must start the miner first.
Launch and console information.
Double click the .bat file containing the selected coin:

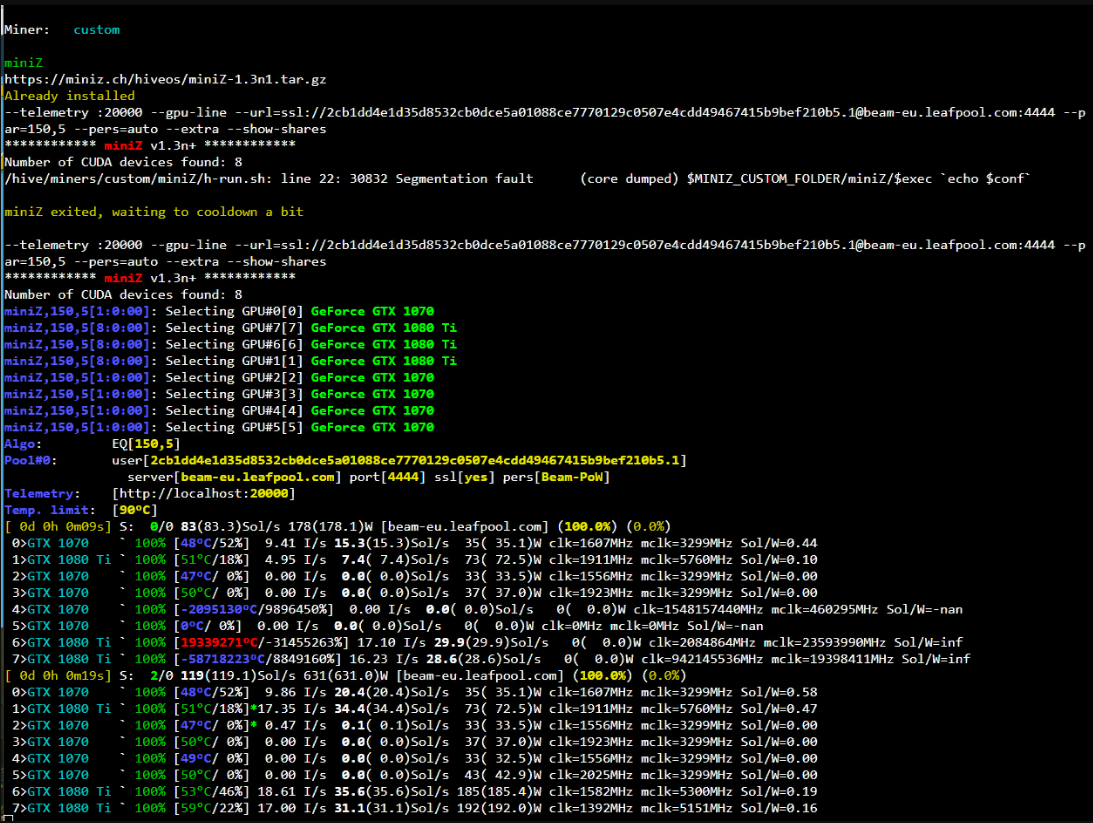
1) All the data we provided in the batch file is displayed at the very top of the console. 2) Number of detected CUDA devices: The application detects one device for mining. 3)Equihash-150-5, selected coin algorithm for EQ150.5. 4)user[0xa08dbd7021784660d19bdbed3996cd5972b38ce1d39b3731a0cc1b09bb7a1625.Worker]\sserver[stratum.aionmine.org] port[3333] ssl[no] information about the wallet where the coin is mined, including pool, port and persBeam-PoW algorithm configuration string. 5) Telemetry: [http://localhost:20000] – at this address you can view the statistics of your miner directly in the browser. 6). Logging::file [miniZ.log] period [10] delay [0]. Includes detailed information about the miner’s event log. Here you can read everything that the console displays.
7) [ 0d 0h 0m09s] S: 0/0 0>GTX 1080 Ti ` 100% [69C/65%] 126.07 I/s 246.0(246.0)Sol/s 143(142.5)W clk=1328MHz mclk=5005MHz Sol/ W=1.73 [beam-eu.leafpool.com] – information about the performance of video cards, including the load, temperature, fan speed, hash rate (we enter the speed into profitability calculators), overclocking the core (clk), memory (mclk) and overall efficiency.
Alternative way to set up.
The second configuration method is to use the miniZ gui.exe file:

1) Decide on the name of the bat-file (in this method, a .bat-file will also be created). 2) To see if the pool allows SSL connections, check the box. 3) Specify the port and address of the pool. 4) Enter the address from your wallet. 5) The name of the employee and his password (usually there is no password on the pools). 6) Describe the algorithm. The algorithm is often chosen by the wallet and pool address, but if it is not already defined, then specify it. 7) In addition, the setting string is often chosen by the application itself. If not defined, please list. (For BEAM currency, e.g. Beam-PoW) 8) Additional options can be specified here, including logging, temperature limiting, and any other commands that we will discuss below. 9) Check the box to restart the miner in case of an error. 10) We investigate what happened on the command line (in fact, we check the wallet that it is yours). 11) Let’s start.
Command line control.
There can only be one command input if there are two commands per line. Its synonym is second. For example, –version and -v are equivalent. You can enter -v or -version.
Basic information:
–version (-v) (-v) Print miniZ version information.
–help (-h) (-h) Display help on the screen, then exit.
Card management:
–cuda-info (-ci) (-ci) Show all available information about the CUDA device (NVIDIA graphics cards).
–cuda-devices (-cd) (-cd) Allow mining on a limited number of machines separated by spaces.
Cd 1 2 will only mine the first and second cards.
Enable all devices except those listed, separated by a space, using the –cuda-exclude (-cde) option.
Intensity:
–intensity=[number] For each visual map, specify the power level of the miner.
For example, intensity = 20.40 gives the first map an intensity of 20 and the second map an intensity of 40 (range [0-100]).
-oc1 To speed up mining, select this option to save power. The specification of each card can be made independently.
For example, -ocl-1,4 applies ocl to maps 1 and 4 (numbering as in -cuda devices). If no graphics card is listed, all devices are affected.
–oc2 To speed up mining with overclocked GPUs, use this option. The specification of each card can be made independently. If no graphics card is listed, all devices are affected.
As in -oc2=2.4
Level 11 forced adjustment function —f11=[number] [0-3]. In general, -f11=0 provides the most efficiency with low power consumption, but you can experiment with other numbers in the overclock settings.
Temperature control and monitoring:
–tempunits=[unit] temperature is displayed in degrees Celsius (C) or Fahrenheit (F). The default is degrees Celsius.
–templimit=[value] Set the maximum temperature above which mining will stop for a minute.
The temperature can be entered in either Celsius (C) or Fahrenheit (F) (F).
When the set temperature is reached, the card will stop mining for one minute and resume mining if the temperature drops.
Parameters for connecting to the pool:
wallet or –user=(-u) Username (DEPRECATED, can be written in one line, examples below).
–server=[-l] The pool address is often the address of the server.
Server/pool port: –port=[port].
Pool password –pass=(-p) (default: x).
–url=[user@server:port] How best to specify all three previous arguments: password plus pool address plus port
–par=[parameters] algorithmic variables:
–pers=[string pers] Personalized algorithm string (sometimes required). Beam-PoW based BEAM instance
–smart-pers If “automatic” configuration is offered, use it.
Error logs and config:
–log All program output should be copied to miniZ.log.
–log-file=[filename] Copy program output to [filename].
–log-period=[seconds] time (in seconds) between automatic log file updates.
–log-delay=[seconds] Wait [delay in seconds] before starting periodic logging to the log file.
–read-config [filename] Open [filename] to read the configuration (default: miniZ.conf).
The configuration –write-config [filename] must be written to [filename] (default: miniZ.conf).
–donate=[donation%] Set the donation amount for developers.
Read more articles about cryptocurrencies and mining at COOL-MINING.ORG.
Do you like to read similar articles about cryptocurrencies and mining, do you want to support me as an author or ask questions? Be the first to know the news, subscribe to my telegram channel
